Installation and setup
Once you have prepared the devices and cables that meet the minimum system requirements, follow the instructions in this section to install the software, setup the network and projectors.
I. Installing Visual Suite
Download and install Visual Suite on the computer for image control.
- Download the software
- Download the installation program at the Optoma website (www.optoma.com), or consult your dealer for the latest version that is compatible with your projector.
- Install the software
- Double click the installation program to open the setup wizard. Install the tool following the on screen instructions. Once the installation is finished, a shortcut icon shows on the desktop.
II. Setting up the network
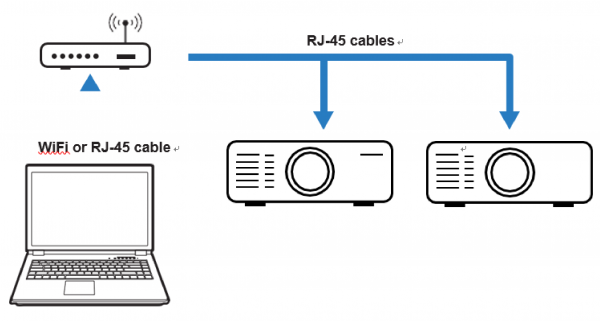
Visual Suite controls the projectors through LAN connections using RJ-45 cables. You can connect the projectors and the computer to an existing network, or make direct connection among the devices using a network hub.
Note: The OSD menu used in this section may be different on your projector. Please check the user manual for more information.
Connecting the projectors and the computer
Complete the following steps to set up a direct connection between the projectors and the computer.
1.Connect the computer to the network hub via WiFi or using an RJ-45 cable.
2.Connect the projectors to the network hub using RJ-45 cables.
Set up a network connection
3.Set the IP address of the projectors and the computer. Ensure each device in the network is assigned with an unique IP address.
- Assign IP address to the projector:
- From the OSD menu, select Network > LAN.
- Turn off DHCP, and manually set the projector’s IP Address.
- Press Enter to confirm the settings.
- Set the IP address of the computer to match the first three numbers of the projector. For example, if the projector IP address is 192.168.000.100, set the computer IP address to 192.168.000.xxx, where xxx is not 100.
- The IP address is used to identify the projector in the software.
Using an existing network
When network is available, connect the projectors and the computer to the same network.
- From the OSD menu, select Network > LAN
- Turn on DHCP to allow the projector automatically acquires an IP address.
- Check the IP address from Network > LAN > IP address
- The IP address is used to identify the projector in the software.
III. Setting up the projectors
Set up the projection system by connecting the projectors to the same input source using video cables. To achieve better uniformity, adjust the power level and image color of the projectors to make the projected images look like the same as much as possible. This ensures a good starting point for further customizing and matching.
Connecting the projectors to the input source
Use video cables to connect the projectors to the same input source. To split one image to several screens, you have to configure image settings on the input device. For example, if you are using a computer installed with an advanced graphic card, you need to set up the graphic card for image split and overlap. For more information, check the user manual of your input device or consult your dealer.

Connect the projectors to an input source
Adjusting the projectors
After connecting the projectors to the same input source, set the power level and image color of the projectors to unify the image performance.
Note:You are going to use the remote control, projector keypad, and OSD menu to perform following adjustments. Some of the settings can also be adjusted with the web control panel. Check the user manual of your projectors for more information.
1.Depending on the projection screen and projector layout, adjust the image size and position.
- Adjust the zoom ratio of the projectors to change the image size.
- Perform lens shift on the projectors to change the image position.
2.Adjust the focus of the projectors to make the images sharp and clear.
3.To achieve better uniformity, set the brightness and image color of the projectors, so that the
images are matching with each other.
- Reset all image settings on each projector.
- Set the projectors to the same display mode and wall color.
- If the projectors are going to run for a long period, enable Constant Power and Constant Luminance functions to avoid natural brightness decay.
- Adjust the color settings of the projectors to unify the color performance of the images.
